Fetch-Execute Cycle
As we shall see, the fetch-execute
cycle forms the basis for operation of a stored-program computer. The CPU fetches each instruction from the
memory unit, then executes that instruction, and fetches the next
instruction. An exception to the “fetch
next instruction” rule comes when the equivalent of a Jump or Go To instruction
is executed, in which case the instruction at the indicated address is fetched
and executed.
Registers vs. Memory
Registers and memory are similar in that both store
data. The difference between the two is
somewhat an artifact of the history of computation, which has become solidified
in all current architectures. The basic
difference between devices used as registers and devices used for memory
storage is that registers are usually faster and more expensive (see below for
a discussion of registers and Level–1 Cache).
The origin of the register vs. memory distinction can be
traced to two computers, each of which was built in the 1940’s: the ENIAC (Electronic Numerical Integrator and Calculator – becoming operational in 1945) and the EDSAC (Electronic Delay Storage Automatic Calculator – becoming operational in 1949). Each of the two computers could have been
built with registers and memory implemented with vacuum tubes – a technology
current and well-understood in the 1940’s.
The difficulty is that such a design would require a very large number
of vacuum tubes, with the associated cost and reliability problems. The ENIAC solution was to use vacuum tubes in
design of the registers (each of which required 550 vacuum tubes) and not to
have a memory at all. The EDSAC solution
was to use vacuum tubes in the design of the registers and mercury delay lines
for the memory unit.
In each of the designs above, the goal was the same – to
reduce the number of “storage units” that required the expensive and
hard-to-maintain vacuum tubes. This
small number of storage units became the register file associated with the
central processing unit (CPU). It was
not until the MIT Whirlwind in 1952 that magnetic core memory was introduced.
In modern computers, the CPU is usually implemented on a
single chip. Within this context, the
difference between registers and memory is that the registers are on the CPU
chip while most memory is on a different chip.
Now that L1 (level 1) caches are appearing on CPU chips (all Pentium™
computers have a 32 KB L1 cache), the main difference between the two is the
method used by the assembly language to access each. Memory is accessed by address as if it were
in the main memory that is not on the chip and the memory management unit will
map the access to the cache memory as appropriate. Register memory is accessed directly by
specific instructions. One of the
current issues in computer design is dividing the CPU chip space between registers
and L1 cache: do we have more registers or more L1 cache? The current answer is that it does not seem
to make a difference.
Both memory and registers can be viewed as collections of D flip-flops, as discussed in a
previous chapter. The main difference is
that registers (as static memory) may
actually be built from these flip-flops, while computer memory is fabricated
from a different technology called dynamic
memory. We often describe main
memory as if it were fabricated from flip-flops as this leads to a model that
is logically correct.
A flip-flop stores one bit of data. An N–bit register is a collection of N
flip-flops; thus a
32–bit register is built from 32 flip-flops.
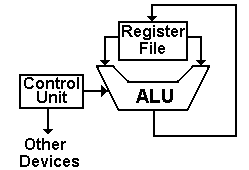
The CPU contains two types of registers, called special purpose registers and general
purpose registers. The general
purpose registers contain data used in computations and can be accessed
directly by the computer program. The
special purpose registers are used by the control unit to hold temporary
results, access memory, and sequence the program execution. Normally, with one now-obsolete exception,
these registers cannot be accessed by the program.
The program status
register (PSR), also called the program
status word (PSW), is one of the
special purpose registers found on most computers. The PSR contains a number of bits to reflect
the state of the CPU as well as the result of the most recent computation. Some of the common bits are
C the carry-out
from the last arithmetic computation
V Set to 1 if the last arithmetic operation resulted in an overflow
N Set to 1 if the last arithmetic operation resulted in a negative number
Z Set to 1 if the last arithmetic operation resulted in a zero
I Interrupts enabled
(Interrupts are discussed later)
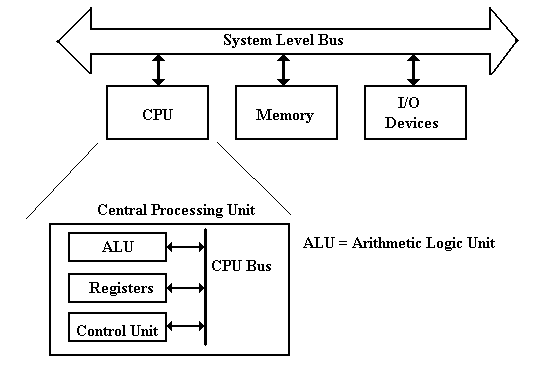
More on the CPU (Central Processing Unit)
The central processing unit
contains four major elements
1) The
ALU (Arithmetic Logic Unit), and
2) The
control unit, and
3) The
register file (including user registers and special-purpose registers), and
4) A
set of buses used for communications within the CPU.
The next figure shows a
better top-level view of the CPU, showing three data buses and an ALU optimized
for standard arithmetic. Most arithmetic
(consider addition: C = A + B) is based on production of a result from two arguments. To facilitate such operations, the ALU is
designed with two inputs and a single output.
As each input and output must be connected to a bus internal to the CPU,
this dictates at least three internal CPU buses.
The register file
contains a number of general-purpose registers accessible to the assembly
language operations (often numbered 0 through some positive integer) and a
number of special-purpose registers not directly accessed by the program. With numbered registers (say R0 through R7)
it is often convenient to have R0 be identically 0. Such a constant register greatly simplifies
the construction of the control unit.
Some of the special purpose
registers used by the central processing unit are listed next.
PC the program counter contains the address of
the assembly language instruction
to be executed next.
IR the instruction register contains the
binary word corresponding to the machine
language version of the
instruction currently being executed.
MAR the memory address register contains the
address of the word in main memory
that is being
accessed. The word being addressed
contains either data or
a machine language
instruction to be executed.
MBR the memory buffer register (also called MDR
for memory data register) is the
register used to
communicate data to and from the memory.
We may now sketch some of
the operation of a typical stored program computer.
Reading Memory First
place an address in the MAR.
Assert
a READ control signal to command memory to be read.
Wait
for memory to produce the result.
Copy
the contents of the MBR to a register in the CPU.
Writing Memory First
place and address in the MAR
Copy
the contents of a register in the CPU to the MBR.
Assert
a WRITE control signal to command the memory.
We have mentioned the
fetch-execute cycle that is common to all stored program computers. We may now sketch the operation of that cycle
Copy the contents of the PC into the MAR.
Assert a READ control
signal to the memory.
While waiting on the
memory, increment the PC to point to the next instruction
Copy the MBR into the
IR.
Decode the bits found
in the IR to determine what the instruction says to do.
The control unit
issues control signals that cause
the CPU (and other components of the computer) to fetch the instruction to the
IR (Instruction Register) and then execute the actions dictated by the machine
language instruction that has been stored there. One might imagine the following sequence of
control signals corresponding to the instruction fetch.
T0: PC to Bus1,
Transfer Bus1 to Bus3, Bus3 to MAR, READ.
T1: PC
to Bus1, +1 to Bus2, Add, Bus3 to PC.
T2: MBR
to Bus2, Transfer Bus2 to Bus3, Bus3 to IR.
This simple sequence
introduces a number of concepts that will be used later.
1. The
internal buses of the CPU are named Bus1, Bus2, and Bus3.
2. All
registers can transfer data to either Bus1 or Bus2.
3. Only
Bus3 can transfer data into a register.
4. Only
the ALU can transfer data from either Bus1 to Bus3 or Bus2 to Bus3.
It does this by a specific
transfer operation.
5. Control
signals are named for the action that they cause to take place.
Operation of the
Control Unit
We now examine very briefly the two most common methods for
building a control unit. Recall that the
only function of the control unit is to emit control signals, so that the
design of a control unit is just an investigation of how to generate control
signals. There are two major classes of
control units: hardwired and microprogrammed (or microcoded). In order to see the difference, let’s write
the above control signals for the common fetch sequence in a more compact
notation.
T0: PC ® Bus1, TRA1, Bus3 ® MAR,
READ.
T1: PC
®
Bus1, +1 ®
Bus2, ADD, Bus3 ®
PC.
T2: MBR
®
Bus2, TRA2, Bus3 ®
IR.
Here we have used ten
control signals. Remember that the ALU
has two inputs, one from Bus1, one from Bus2, and outputs its results on
Bus3. The control signals used are:
PC ®
Bus1 Copy the contents of the PC
(Program Counter) onto Bus1
+1 ® Bus2 Copy the contents of the constant
register +1 onto Bus2.
MBR ® Bus2 Copy the contents of the MBR (Memory
Buffer Register) onto Bus2
TRA1 Causes
the ALU to copy the contents of Bus1 onto Bus3
TRA2 Causes
the ALU to copy the contents of Bus2 onto Bus3
ADD Causes
the ALU to add the contents of Bus1 and Bus2,
placing
the sum onto Bus3.
READ Causes
the memory to be read and place the results in the MBR
Bus3 ® MAR Copy the contents of Bus3 to the MAR
(Memory Address Register)
Bus3 ® PC Copy the contents of Bus3 to the PC (Program Counter)
Bus3 ® IR Copy the contents of Bus3 to the IR (Instruction Register)
All control units have a
number of important inputs, including the system clock, the IR, the PSR
(program status register) and other status and control signals. A hardwired
control unit uses combinational logic to produce the output. The following shows how the above signals
would be generated by a hardwired control unit.
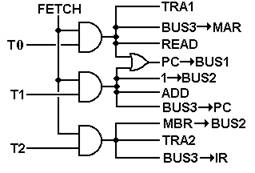
Here we assume that we have the
discrete signal FETCH, which is asserted during the fetch phase of the
instruction processing, and discrete time signals T0, T1, and T2, which would
be generated by a counter within the control unit. Note here that we already have a naming
problem: there will be a distinct phase of the Fetch/Execute cycle called
“FETCH”. During that cycle, the discrete
signal FETCH will be active. This
discrete signal is best viewed as a Boolean value, having only two values:
Logic 1 (+5 volts) and Logic 0 (0 volts).
We next consider how a microprogrammed unit would generate
the above signals. In this discussion,
we shall present a simplified picture of such a control with a number of design
options assumed; these will be explained later in the text.
The central part of a microprogrammed control unit is the micro-memory, which is used to store
the microprogram (or microcode). The microprogram essentially interprets the
machine language instructions in that it causes the correct control signals to
be emitted in the correct sequence. The
microprogram, written in microcode, is stored in a read-only memory (ROM, PROM,
or EPROM), which is often called the control
store.
A microprogrammed control unit functions by reading a
sequence of control words into a microinstruction buffer that is used to
convert the binary bits in the microprogram into control signals for use by the
CPU. To do this, there are several other
components
the mMAR the micro-address of the next control word
to read
the mMBR this holds the last control word read from
the micro-memory
the sequencer this computes the next value of the address
for the mMAR.
The figure below shows the structure of a sample
microprogrammed control unit.
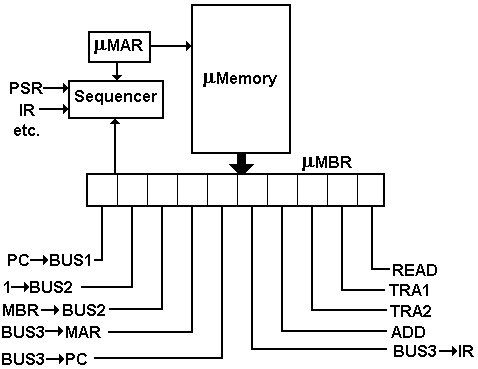
The microprogram for the three steps in fetch would be
10010 00011
11001 01000
00100 10100
Structure of a
Typical External Bus
A typical computer contains a number of bus structures. We have already mentioned the system bus and
a bus internal to the CPU. Some computer
designs include high-speed point-to-point busses, used for such tasks as
communication to the graphics card. In
this section, we consider the structure of the system bus. The system bus
is a multi-point bus that allows
communication between a number of devices that are attached to the bus. There are two classes of devices that can be
connected to the bus
Master Device a
device that can initiate action on the bus.
The
CPU is always a bus master.
Slave Device a device that responds to requests by a bus master.
Memory
is an excellent example of a slave device.
Devices connected to a bus are
often accessed by address. System memory
is a primary example of an addressable device; in a byte-addressable machine (more later on this), memory can be
considered as an array of bytes, accessed in the same way as an array as seen
in a typical programming language. I/O
devices are often accessed by address; it is up to the operating system to know
the address used to access each such device.
A typical bus can be considered
as a number of wires (called lines)
that act as a common path to connect the devices. The lines fall into a number of major classes
Data lines used
to transfer the data between the two devices
Address lines used to identify the device or memory location to which the
data
are written or from which the data are read
Control lines used to indicate what operation is to be done
Power & Ground used to provide a common power and common
ground.
We ignore these in the logical
model, but they are necessary.
Structure of a PDP-11 UNIBUS
For a foray into the real world
(or the world that once was real), we quote from two publications describing
the UNIBUS™ on a PDP-11, a minicomputer marketed by the Digital Equipment
Corporation (DEC – now a part of Hewlett-Packard). We quote from three manuals published by DEC.
“CROSSTALK
The unwanted transfer of energy from one circuit, called the disturbing
circuit, to another circuit, called the disturbed circuit.”[R12]
“UNIBUS
The single, asynchronous, high-speed bus structure shared by the PDP-11
processor, its memory, and all of its peripherals [Input/Output Units]” [R12]
“UNIBUS Cable BC11A
The BC11A is a 120-conductor cable … The 120 signals include all 56 UNIBUS
lines plus 64 grounds. Signals and
grounds alternate to minimize crosstalk.”[R13]
The following table is adapted
from the PDP-11 Peripherals Handbook [R-3].
|
Name
|
Mnemonic
|
Lines
|
Function
|
Asserted
|
|
DATA
|
|
|
|
|
|
Address
|
A<17:00>
|
18
|
Selects device or memory
|
Low
|
|
Data
|
D<15:00>
|
16
|
Data for transfer
|
Low
|
|
Control
|
C0, C1
|
2
|
Type of data transfer
|
Low
|
|
Master Sync
|
MSYN
|
1
|
Timing controls for data
transfer
|
Low
|
|
Slave Sync
|
SSYN
|
1
|
Low
|
|
Parity
|
PA, PB
|
2
|
Device parity error
|
Low
|
|
Interrupt
|
INTR
|
1
|
Device interrupt
|
Low
|
|
|
|
41
|
|
|
|
PRIORITY
|
|
|
|
|
|
Bus Request
|
BR4, BR5, BR6, BR7
|
4
|
Requests use of bus
|
Low
|
|
Bus Grant
|
BG4, BG5, BG6, BG7
|
4
|
Grants use of bus
|
High
|
|
Non-Processor Request
|
NPR
|
1
|
Requests use of bus
|
Low
|
|
Non-Processor Grant
|
NPG
|
1
|
Grants use of bus
|
High
|
|
Selection Acknowledge
|
SACK
|
1
|
Acknowledges grant
|
Low
|
|
Bus Busy
|
BBSY
|
1
|
Data section in use
|
Low
|
|
|
|
12
|
|
|
|
INITIALIZATION
|
|
|
|
|
|
Initialize
|
INIT
|
1
|
System Reset
|
Low
|
|
AC Low
|
AC LO
|
1
|
Monitor power
|
Low
|
|
DC Low
|
DC LO
|
1
|
Monitor power
|
Low
|
|
|
|
3
|
|
|
Figure: PDP-11 UNIBUS CONTROL SIGNALS
In the above figure, we see
provision for five priority levels for I/O devices – levels 4, 5, 6, and 7 and
also a level called NPR for Non-Processor Request, a high-priority interrupt
for access to memory not involving the processor; this is now called DMA.
Memory Mapped vs. Isolated
I/O
The PDP-11 is an example of a
computer with memory-mapped Input/Output. What this name implies is that all devices,
both the memory and the I/O devices share a common bus (on the original PDP-11
it was the UNIBUS™). Some addresses on
the bus would refer to I/O devices and some to memory. On the early PDP-11 specifications, octal
addresses
760 000 through 777 777 referred to I/O devices and all other addresses were
memory.
A computer with isolated I/O has at least two buses –
one for memory references and one for access to the I/O devices. The advantage of the isolated I/O design is
that all of the addresses are available for memory references, thus allowing
more memory. It is the assembly language
instruction that indicates that the address given is to refer to an I/O
device. The disadvantage of this scheme
is that there must be explicit I/O instructions, leading to a design that is
“less elegant”.
One should be serious about the
design issue of explicit I/O instructions.
A typical computer design will allocate a fixed number of bits to
specify the instruction to be executed; this limits the number of instructions
possible. If N bits are allocated to
specify the instruction, there is a maximum of 2N instructions. For a small value of N, this can become a
serious constraint on the design and the elimination of two I/O instructions
(Read from Device and Write to Device) becomes an appealing option.
Synchronous and Asynchronous
Buses
Older bus designs and
Input/Output bus designs tend to be asynchronous. Such a bus, called an asynchronous bus, operates without a clock to synchronize data
transfers and thus must use control signals to coordinate the operations; these
must conform to a bus protocol. A typical protocol for an asynchronous bus
includes the following signals
Bus Request the
device is requesting use of the bus to transfer data
Bus Grant the device is granted use of the bus
Bus Busy asserted by a device granted the bus to prevent
collisions
A synchronous bus uses a clock line to synchronize operations. Note that the bus clock rate is almost never
the same of the system clock, but a fraction of it. For example, a computer with a 3.08 GHz CPU
might have a 133 MHz memory bus. It is
almost always the case that the CPU is the fastest component of the computer,
due to the fact that it is the smallest component. In modern designs, the memory bus (connecting
the CPU to the random access memory) tends to be synchronous. This is due to the fact that memory timings
can be known in advance – thus we can rely on the speed at which data can be
transferred to and from memory. Older
designs transferred one memory word per clock pulse; newer synchronous designs,
called DDR (double data rate) transfer
data on both the rising and falling edges of the clock – hence doubling the
data transfer rate. This subject will be
discussed more in a later chapter, when the issue of interfacing memory to the
CPU will be discussed.
A recent (10/20/2004) search
the Dell Computer Internet web site ( http://www.dell.com/ ) included a claim
that the computer had “next generation dual channel DDR2 memory – up to 16 GB
of 400MHz registered ECC memory”. This
implies that the main bus connecting the CPU to memory operated at 400 MHZ
(with a clock cycle of 2.5 nanoseconds) and could make transfers at a rate of
800 million per second – that is 400 million times 2 as the bus is a second
generation Double Data Rate device. It
can be inferred from this web site that the memory bus is actually 64-bits
wide, allowing for the parallel transfer of eight bytes at a time, giving a
data transfer rate of 6,400 million per second or 6.4GB/sec.
The reader should note that
the figure 6.4GB/sec and the figures leading up to that result are the work of
the author of these notes and might not be exactly correct.
Levels of Machines and Virtual Machines
As with any system, a
computer can be viewed from a number of perspectives or levels of detail. Each level corresponds to a virtual machine –
one able to execute directly a specific language. For example, many people view computers as
virtual machines that directly execute e-mail programs, spread sheets, or word
processors. These people do not care
about the lower level instructions that actually cause the machine to function,
nor should they.
Put another way, many people
consider the computer as just another appliance – that is, something that does
its job with little human interaction.
In this author’s opinion, this fact is one of the major achievements of
the computer industry.
“Levels” of Automobiles
In order to motivate the
idea of levels of machines, let us consider what might be called “levels of
automobiles” or more precisely, the level of detail at which a particular user
chooses to understand an automobile. As
an example, let us think about the Rolls Royce Phantom (the 2004 model is
priced at only $470,000, in case you want to buy one). There are a number of levels at which to view
this automobile.
The automobile collector will view the car as a work of art. The possibility that one might drive the
thing might not even occur to him or her.
The VIP (very rich person or diplomat) will view the automobile as
something that transports him or her to the desired destination. Admittedly, the automobile does not drive
itself, but it might as well, given the fact that it almost always has a paid
chauffeur.
The casual driver will understand the basics of operating the vehicle –
use of the keys, transmission, steering wheel, and other controls. To this person, the automobile is just a
machine that can be controlled in predictable ways.
The more involved driver will, in addition,
understand that the automobile comprises a number of subsystems, such as the
chassis, engine, transmission, and electronic systems. He or she will understand the necessity of
system maintenance without being able to perform it.
The automobile mechanic will understand the details of each of the
automobile subsystems and how to repair them.
Note that this is a lower (more detailed) level of understanding than
the involved driver. The mechanic not
only understands that the subsystems exist but also understands how they work
and how to fix them.
The automobile engineer will understand one of the subsystems in detail,
for example the detailed kinetics of fuel combustion, metallurgy of the engine
block, or dynamics of the electrical system.
Using this analogy, the goal
of this course is to give the student an understanding of a computer somewhere
between that of a mechanic and an engineer.
Levels of Machines in the
Computer Hierarchy
A traditional view of the
computer (see Tanenbaum [R15] or Murdocca & Heuring [R16]) presents between
five and eight levels of machines. Here
we construct a typical list.
9. Application Programs
(Appliance level),
8. High
Level (Problem Oriented) Languages,
7. Assembly
language,
6. Operating
system services (such as BIOS calls)
5. Binary
machine language,
4. Micro-operation
level (usually microprogramming),
3. Functional
units (memory, ALU, etc.)
2. Logic
gates, including SSI and MSI components.
1. Transistors
and wires.
We skip over level 9
(application programs) and begin our top-down study with level 8 (High Level
Languages). A high-level language
programmer may experience the computer as a machine that directly executes the
high-level language, such as C++, Visual Basic, COBOL, or FORTRAN. In fact, very few machines are designed for
direct execution of high-level languages (there are several LISP machines and a
FORTH machine), but one may imagine a virtual
machine that does exactly that. In
practice, most virtual machines operating at the high-level language level
achieve their effect by compiling the program into a form suitable for
execution on a lower-level machine. The
figure below shows two of the more common ways in which a high-level language
virtual machine functions.
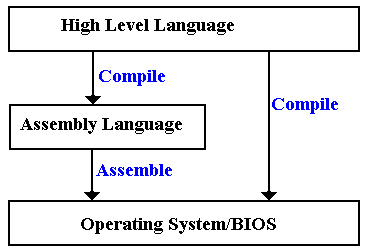
Before discussing this
figure, it is important to understand the differences between level 6 (the
Operating System/BIOS level) and level 5 (the Binary Machine Language
level). In some aspects, levels 5 and 6
are identical. The major difference is
that level 6 may be regarded as providing standard service routines, such as
those in the Basic Input-Output System (BIOS).
The operating code for both levels 5 and 6 is binary machine code.
Some compilers (mainly the
older ones) compile directly to assembly language, which is then assembled into
calls to level 6 machine language. Some
compile directly to level 6 code.
At this point, we see an important
part of the separation of levels.
Consider modern languages, such as C++ and Java. At level 8, all computers that execute such
code appear to be almost identical, with slight differences (such as integer
sizes) that can be handled by use of macros and other definitions. At level 7, the computers may appear quite
different as each computer brand seems to have its own particular assembly
language.
The transition between
levels 6 and 7 (assembly language & O/S services) and level 5 is often
achieved by a linking loader. This
transition allows programs to be loaded at any free part of memory, rather than
at fixed locations (as was the case with some earlier machines). Thus we have two views of machines – the
level 6/7 virtual machine in which the program always loads at a fixed location
and the level 5 machine in which the program is relocated.
The split between levels 5
and 4 reflects the fact that there are a number of ways in which to implement a
Central Processing Unit (CPU) to execute a machine language. The two primary methods for machine language
execution are hard-wired and microprogrammed.
This separation between these two levels allows a company to build a
series of computers with widely differing performance levels but with the same
assembly/machine language set. For
examples, we look to the IBM 360 series and the DEC (Digital Equipment
Corporation – no longer in business) PDP–11 series.
Here is a quote from an
article by C. Gordon Bell in William Stallings []. It discusses two different implementations of
the IBM 360 family, each with the same assembly language.
“The IBM 360,
introduced in 1964, was one of the earliest computer families to span a range
of price and performance. Along with the
360, IBM introduced the word ‘architecture’ to refer to the various processing
characteristics of a machine as seen by the programmer and his programs. In the initial 360 product family, the model
91 exceeded the model 20 in performance by a factor of 300, in memory size by a
factor of 512, and in price by a factor of 100.”
The next three layers form
the basis for the hardware implementation of the computer. As technology improves, we see two trends in
implementation at this level: more powerful units for the same price and
equally powerful units for a lesser price.
One very early example of this was the IBM 709/7090 series, both of
which implemented the same machine language and used the same hardwired control
design. The difference is that the IBM
709 used vacuum tubes as the basic circuit elements, while the IBM 7090 used
transistors.
Probably the major
revolution in computer design occurred at these low levels with the
introduction to the integrated circuit to replace circuits built from discrete
transistors. The transition from vacuum
tubes to transistors resulted in considerable gains in reliability and
reductions in power usage. The
transition from transistors to integrated circuits, especially VLSI (Very Large
Scale Integration) chips allowed the introduction of the modern micro-computer
and all that has gone with it.
RISC vs. CISC Computers
One of the recent developments in computer architecture is
called by the acronym RISC. Under this
classification, a design is either RISC or CISC, with the following
definitions.
RISC Reduced Instruction
Set Computer
CISC Complex Instruction Set Computer.
The definition of CISC architecture is very simple – it is
any design that does not implement RISC architecture. We now define RISC architecture and give some
history of its evolution.
The source for these notes is the book Computer Systems
Design and Architecture, by Vincent P. Heuring and Harry F. Jordan.
One should note that while the name “RISC” is of fairly
recent origin (dating to the late 1970’s) the concept can be traced to the work
of Seymour Cray, then of Control Data Corporation, on the CDC–6600 and related machines. Mr. Cray did not think in terms of a reduced
instruction set, but in terms of a very fast computer with a well-defined
purpose – to solve complex mathematical simulations. The resulting design supported only two basic
data types (integers and real numbers) and had a very simple, but powerful,
instruction set. Looking back at the
design of this computer, we see that the CDC–6600 could have been called a RISC
design.
As we shall see just below, the entire RISC vs. CISC
evolution is driven by the desire to obtain maximum performance from a computer
at a reasonable price. Mr. Cray’s
machines maximized performance by limiting the domain of the problems they
would solve.
The general characteristic of a CISC architecture is the
emphasis on doing more with each instruction.
This may involve complex instructions and complex addressing modes; for
example the MC68020 processor supports 25 addressing modes.
The ability to do more with each instruction allows more
operations to be compressed into the same program size, something very
desirable if memory costs are high. Some
historical data will illustrate the memory issue.
|
Time
|
Cost of memory
|
Cost of disk drive
|
|
Introduction of MC6800
|
$500 for 16KB RAM
|
$55,000 for 40 MB
|
|
Introduction of MC68000
|
$200 for 64 KB RAM
|
$5,000 for 10 MB
|
|
Now (Micron 4/10/2002)
|
$49 for 128 MB RAM
|
$149 for 20 GB
|
Another justification for the CISC architectures was the
“semantic gap”, the difference between the structure of the assembly language
and the structure of the high level languages (COBOL, C++, Visual Basic,
FORTRAN, etc.) that we want the computer to support. It was expected that a more complicated
instruction set (more complicated assembly language) would more closely
resemble the high level language to be supported and thus facilitate the
creation of a compiler for the assembly language.
One of the first motivations for the RISC architecture came
from a careful study of the implications of the semantic gap. Experimental studies conducted in 1971 by
Donald Knuth and 1982 by David Patterson showed that nearly 85% of a programs
statements were simple assignment, conditional, or procedure calls. None of these required a complicated instruction
set. It was further notes that typical
compilers translated complex high level language constructs into simpler
assembly language statements, not the complicated assembly language
instructions that seemed more likely to be used.
The results of this study are quoted from an IEEE Tutorial
on RISC architecture [R05]. This table
shows the percentages of program statements that fall into five broad
classifications.
|
Language
|
Pascal
|
FORTRAN
|
Pascal
|
C
|
SAL
|
|
Workload
|
Scientific
|
Student
|
System
|
System
|
System
|
|
Assignment
|
74
|
67
|
45
|
38
|
42
|
|
Loop
|
4
|
3
|
5
|
3
|
4
|
|
Call
|
1
|
3
|
15
|
12
|
12
|
|
If
|
20
|
11
|
29
|
43
|
36
|
|
GOTO
|
2
|
9
|
--
|
3
|
--
|
|
Other
|
|
7
|
6
|
1
|
6
|
The authors of this study made the following comments on the
results.
“There is quite good
agreement in the results of this mixture of languages and applications. Assignment statements predominate, suggesting
that the simple movement of data is of high importance. There is also a preponderance of conditional
statements (If, Loop). These statements are implemented in machine
language with some sort of compare and branch instruction. This suggests that the sequence control
mechanism is important.”
The “bottom line” for the
above results can be summarized as follows.
1) As
time progresses, more and more programs will be written in a compiled high-
level language, with much
fewer written directly in assembly language.
2) The
compilers for these languages do not make use of the complex instruction
sets provided by the
architecture in an attempt to close the semantic gap.
In 1979, the author of these
notes attended a lecture by a senior design engineer from IBM. He was discussing a feature of an
architecture that he designed: he had put about 6 months of highly skilled
labor into implementing a particular assembly language instruction and then
found that it was used less than 1/10,000 of a percent of the time by any
compiler.
So the “semantic gap” – the
desire to provide a robust architecture for support of high-level language
programming turned out to lead to a waste of time and resources. Were there any other justifications for the
CISC design philosophy?
The other motivation for the RISC architecture is that a
complex instruction set implies a slower computer. It is not just the fact that the more complex
instructions execute more slowly than the simpler instructions. There is also the fact that making a CPU
capable of handling more complex instructions causes it to execute simple
instructions more slowly.
Thus we are facing the facts that the more complex
instruction sets are not necessary and that dropping the ability to support
them will yield a faster CPU. There are
other factors that favor the RISC architecture, specifically the fact that
speed-up techniques such as instruction pre-fetching and instruction pipelining
are more easily achieved for simple instructions.
The name RISC, Reduced
Instruction Set Computer, focuses on reducing the number and complexity of
instructions in the machine. A number of
common strategies are:
1) Fixed instruction
length, generally one word. This
simplifies instruction fetch.
2) Simplified
addressing modes.
3) Fewer
and simpler instructions in the instruction set.
4) Only
load and store instructions access memory; no add memory to register, etc.
5) Let
the compiler do it. Use a good compiler
to break complex high-level language
statements into a number of
simple assembly language statements.
The philosophy behind the RISC
approach is well described in the IEEE tutorial. Here we pick up on a narrative by a design
engineer who worked on the IBM 801 project.
“About this point,
several people, including those who had been working on microprogramming tools,
began to rethink the architectural design principles of the 1970’s. In trying to close the ‘semantic gap’, these
principles had actually introduced a ’performance gap’. The attempt to bridge the gap with WCS’s
[Writable Control Stores – microprogrammed control units] was unsuccessful.”
“A new computer
design philosophy evolved: Optimizing compilers could be used to compile
‘normal’ programming languages down to instructions that were as unencumbered
as microinstructions in a large virtual address space, and to make the
instruction cycle time as fast as the technology would allow. These machines would have fewer instructions
– a reduced set – and the remaining instructions would be simple and would
generally execute in one cycle – reduced instructions – hence the name reduced
instruction set computers (RISC’s).
RISC’s inaugurated a new set of architectural design principles.
1. Functions should be kept
simple unless there is a very good reason to do
otherwise.
2. Microinstructions should not
be faster than simple instructions.
3. Microcode is not magic.
4. Simple decoding and
pipelined execution are more important than
program size.
5. Compiler technology should
be used to simplify instructions rather
than to generate complex
instructions.”
The narrative from the tutorial
continues with remarks on the RISC architectures developed at the University of California
at Berkeley.
“Although each
project [the Berkeley RISC I and RISC II and the IBM 801] had different
constraints and goals, the machines they eventually created have a great deal
in common.
1. Operations are
register-to-register, with only LOAD and STORE
accessing memory.
2. The operations and
addressing modes are reduced. Operations
between registers complete in one cycle, permitting a simpler, hardwired
control for each RISC, instead of microcode.
Multiple-cycle instructions such as floating-point arithmetic are either
executed in software or in a special-purpose processor. (Without a coprocessor, RISC’s have mediocre
floating-point performance.) Only two
simple addressing modes, indexed and PC-relative, are provided. More complicated addressing modes can be
synthesized from the simple ones.
3. Instruction formats are
simple and do not cross word boundaries.
This restriction allows RISC’s to remove instruction decoding time from
the critical execution path. … RISC register
operands are always in the same place in the
32-bit word, so register access can take place simultaneously with opcode
decoding. This removes the instruction
decoding stage from the pipelined execution, making it more effective by
shortening the pipeline.”
There are a number of other
advantages to the RISC architecture. We
list a few
Better Access to Memory Better Support of Compilers
According to the IEEE Tutorial
“Register-oriented
architectures have significantly
lower data memory bandwidth. Lower data
memory bandwidth is highly desirable since data access is less predictable than
instruction access and can cause more performance problems.”
We note that, even at 6.4
GB/second data transfer rates, access to memory is still a bottleneck in modern
computer design, so any design that reduces the requirement for memory access
(here called reducing the memory bandwidth) would be advantageous.
Better Support of Compilers
According to the IEEE Tutorial
“The load/store
nature of these [existing RISC] architectures is very suitable for effective register
allocation by the compiler; furthermore, each eliminated memory reference
results in saving an entire instruction.”
We note here that more
effective register allocation by a compiler will usually result in
faster-running code. We see this as another
advantage of the RISC design.
Instruction Pre-Fetching
One advantage of the RISC
architecture is seen in the process referred to as
instruction pre-fetching. In this
process, we view the fetch-execute process as a pipeline.

In a traditional fetch-execute
machine, the instruction is first fetched from memory and then executed. Very early in CPU design, it was recognized
that the fetch unit should be doing something during the time interval for
executing the instruction. The logical
thing for the fetch unit to do was to fetch the instruction in the next memory
location on the chance that it would be the instruction that would be executed
next. This process has been shown to
improve computer performance significantly.
The logic to pre-fetch instructions is facilitated by the RISC design
philosophy that all instructions are the same size, so in a machine based on
32-bit words the pre-fetch unit just grabs the next four bytes.
Instruction pre-fetching
appears rather simple, except in the presence of program jumps, such as occur
in the case of conditional branches and the end of program loops. A lot of work has gone into prediction of the
next instruction in such cases, where there are two instructions that could be
executed next depending on some condition.
It may be possible to execute both candidate instructions and discard
the result of the instruction not in the true execution path.
Implications for the Control Unit
The complex instructions in a
CISC computer tend to require more support in the execution than can
conveniently be provided by a hardwired control unit. For this reason, most CISC computers are
microprogrammed to handle the complexity of each of the instructions. For this reason, most CISC instructions
require a number of system clock cycles to execute. The RISC approach emphasizes use of a simpler
instruction set that can easily be supported by a hardwired control unit. As a side effect, most RISC instructions can
be executed in one clock cycle. A given
computer program will compile into more RISC instructions than CISC
instructions, but the CISC instructions execute more slowly than the RISC
instructions. The overall effect on the
computer program may be hard to predict.
According to the IEEE
tutorial
“Reducing the
instruction set further reduces the work a RISC processor has to do. Since RISC has fewer types of instructions
than CISC, a RISC instruction requires less processing logic to interpret than
a CISC instruction. The effect of such
simplification is to speed up the execution rate for RISC instructions. In a RISC implementation it is theoretically
possible to execute an instruction each time the computer’s logic clock
ticks. In practice the clock rate of a
RISC processor is usually three times that of the instruction rate.”
We close this section by
giving a comparison of some RISC and CISC computers and quoting some of the
experience of the Digital Equipment Corporation when it tried to manufacture a
RISC version of its Micro-VAX (a follow-on to the PDP-11).
Here is the table, taken
from the IEEE tutorial on RISC architecture.
|
|
CISC Type Computers
|
RISC Type
|
|
|
IBM 370/168
|
VAX-11/780
|
Intel 8086
|
RISC I
|
IBM 801
|
|
Developed
|
1973
|
1978
|
1978
|
1981
|
1980
|
|
Instructions
|
208
|
303
|
133
|
31
|
120
|
|
Instruction size (bits)
|
16 – 48
|
16 – 456
|
8 – 32
|
32
|
32
|
|
Addressing Modes
|
4
|
22
|
6
|
3
|
3
|
|
General Registers
|
16
|
16
|
4
|
138
|
32
|
|
Control Memory Size
|
420 Kb
|
480 Kb
|
Not given
|
0
|
0
|
|
Cache Size
|
64 Kb
|
64 Kb
|
Not given
|
0
|
Not given
|
Note the control memory size
on the two RISC type computers – each has no control memory. This implies that the control unit is purely
hardwired. Experience in the 1980’s and
early 1990’s suggested that microprogrammed control units were preferable, even
if they were a bit slower than hardwired units.
It was argued that the speed of the control unit was not the limiting
factor in performance, and it probably was not.
The plain fact, however, was that implementing a hardwired control unit
for some of the complex instruction sets was a daunting challenge not willingly
faced by the computer designers. Rather
than spend a great fortune on designing, building, and debugging such a unit,
they elected to create control units that could be managed – these were
microprogrammed.
With the development of RISC
architecture, hardwired control units again became feasible.
Another Look at Microprogrammed Control Units
In considering the RISC
design, we should recognize the fact that it is not equivalent to use of a
hardwired control unit; only more compatible with such a unit. Many modern control units might be considered
as hybrid, with mostly hardwired control and provisions for the use of
micro-routines (in microcode) to handle useful, but complex, instructions.
It has been hinted above
that microprogramming has been used as a tool to allow feasible and
cost-effective implementations of complex instruction sets. It is profitable to consider the correlation
between complex instructions and the use of a microprogrammed control unit; specifically
asking the question of the allocation of lines of microcode to assembly
language instructions.
Digital Equipment
Corporation (DEC) undertook an experiment to investigate this correlation and
produced a design yielding interesting, but not surprising, results, which are
again quoted from the IEEE tutorial on RISC architecture.
“DEC reported a
subsetting experiment on two implementations of the VAX architecture in
VLSI. The VLSI VAX has nine custom VLSI
chips and implements the complete VAX-11 instruction set. DEC found that 20.0 percent of the
instructions are responsible for 60.0 percent of the microcode and yet are only
0.2 percent of all instructions executed.
By trapping to software to execute these instructions, the MicroVAX 32
was able to fit the subset architecture onto only one chip, with an optional
floating-point processor on another chip.
.. The VLSI VAX uses five to ten times the resources of the MicroVAX 32
to implement the full instruction set, yet is only 20 percent faster.”
|
|
VLSI VAX
|
MicroVAX 32
|
|
VLSI Chips
|
9
|
2
|
|
Microcode
|
480K
|
64K
|
|
Transistors
|
1250K
|
101K
|
The result is obvious – a
simple and cheaper computer will do most of what you want. The rest can be better done in software.