The Basic Process
1. Start the Terminal Emulator
2. Log onto the Mainframe
3. Copy the program to be run (if needed)
4. Edit the program to add the required features.
5. Submit the program for execution.
6. Examine the results of running the program.
7. Notify the instructor of success,
so that the output can be
examined and graded.
We start with a few cautions about running the
terminal emulator
in the standard mode that is most useful for accessing the Mainframe.
What Keys to Use?
Here is a depiction of a modern keyboard.
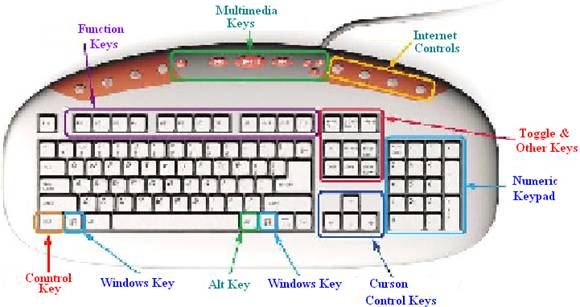
Avoid the following sets of keys:
The
Numeric Keypad Keys
The
Toggle and Other Keys
The
Cursor Control Keys (with some exceptions)
The Windows Key, Control Key, Alt Key, and keys at the top.
Be Careful With the
Backspace Key
The preferred mode for accessing the Mainframe is called
OVERWRITE
mode, in which a character replaces the one just after the cursor.
This differs from INSERT mode, which is the more
commonly used.
Consider changing the string “AAABBBCCC” to read “AAADDDCCC”.
Insert mode: Place
the cursor after the “BBB”, backspace 3 times,
and then
insert the “DDD”. Get “AAADDDCCC”.
Overwrite mode: Place the cursor after the “BBB”, backspace 3 times,
to get
the string “AAACCC”.
Insert
the string “DDD” to get “AAADDD”.
What happened? After the backspace, the cursor position was
just following
the “AAA”; view the string
as “AAA|CCC”.
The
“DDD”
replaced the next three characters in the string
“AAACCC”, which were
the “CCC”.
Lesson: In
Overwrite mode, be cautious with the backspace key.
Locking and Unlocking the
Keyboard
Upon occasion, some mistake will cause the keyboard to
“lock up”.
You will see the string “XMIT Lock” in the lower pane
of the Emulator.
When this string is displayed, the emulator does not
respond to the keyboard.
There
are two remedies.
1. First try to hit the ESC (Escape) key a few
times.
The usually will unlock the
keyboard.
2. If that does not work, hit Ctrl–Q and then
Ctrl–S.
Hit these keys alternately until
the string disappears.
Logging Onto
the Mainframe
To Log On 1. Start
the terminal emulator
2. Connect to the Mainframe (File menu or
Alt–C). You may
also click on
the “lightning bolt” below the File menu entry.
3. Optionally, press the CAPS LOCK key on the
keyboard,
as what you
enter is best done as uppercase letters.
4. Enter the string “L TSO” followed by the
Enter Key.
5. You should enter your user ID at the prompt.
6. Enter your password in the position
indicated by the cursor.
7. The system will display a few pages of
standard
announcements,
which may be disregarded.
Hit
the ENTER key to move to the next announcements.
8. The last announcement page (or partial page)
will end with
“LAST MESSAGE
FROM VENDOR.CLIST”.
Hit ENTER again. You are logged onto the Mainframe.
Logging Off
the Mainframe
We shall discuss this in detail later.
For now, we present a CAUTION.
YOU MUST LOG
OFF THE SYSTEM IN THE
In particular:
1. Return the system to a specific screen
(discussed later)
2. Enter the string “LOGOFF”.
3. Then stop the Terminal Emulator.
If you close the emulator without logging off the
system, your session with
the Mainframe will not be closed properly.
It is possible that you might not be able to log back
into the system
for an hour. While the time might be as
small as 10 minutes, this is not certain.
The
terminal emulator itself is a proper Windows program;
the process running on the IBM Mainframe is not.
Your First Login
1. If this
is your first login, you will each use the default password
assigned for the class. On some occasions, it is the five character
string “CSUPW” (without the
quotes), and at others it is your User ID.
2. Enter the
password, followed by the Enter key.
3. On your
first login, you will be prompted to select and confirm
a new password. The best lengths seem to be five or six
characters.
DO NOT USE MORE THAN SEVEN CHARACTERS FOR YOUR
PASSWORD, AS THIS WILL LEAD TO STRANGE HAPPENINGS.
4. You will
then see events proceed as described above.
If this does not happen, contact
the instructor immediately.
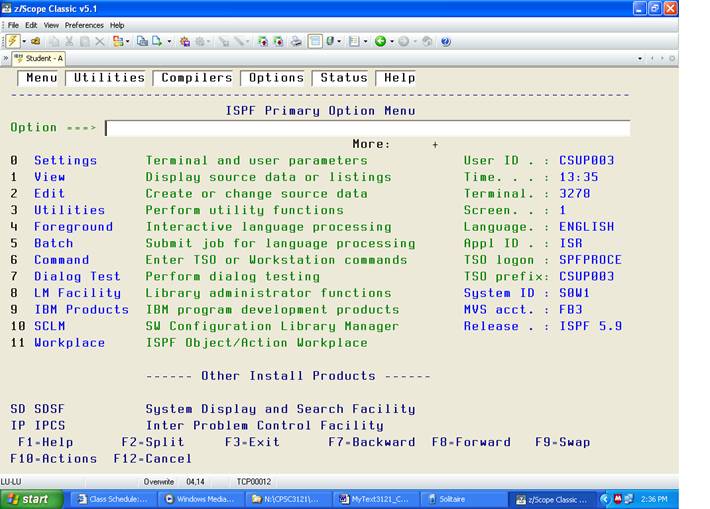
The ISPF Primary Menu
After the login sequence has been completed, you will should see this menu.
Getting the First Program
There are two ways to generate the first program.
1. You may open the editor and enter the entire
program manually.
This is tedious and almost
certain to introduce errors into your text.
2. You may copy the standard program from the
Public Library and
modify that program as needed.
The next few slides describe the preferred method to
get the first program,
which is titled “LAB01”. Most students
will store the file with the same name.
3. In the Primary Options Menu, put a 3 into the
Options area and hit Enter.
4. This brings you to the Utilities Menu. Again put a 3 into the Options area
and hit Enter. This brings you to the Copy/Move menu.
5. Complete the “From Data Set” menu as shown
below.
6. Complete the “To Data Set” menu as shown
below.
7. Hit
F3 one or more times to return to the ISPF Primary Options Menu.
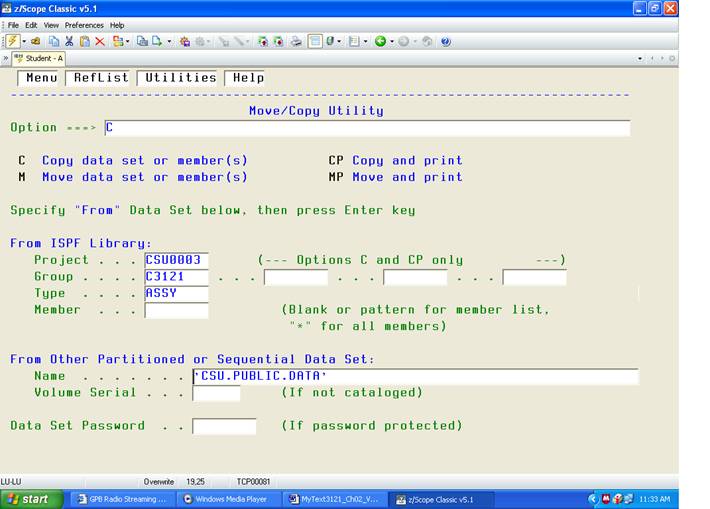
The “From Data Set” Menu
Described
1. Place the single character “C” into the
Options part of the menu.
2. Hit the TAB key to move to another field.
Do not
hit the ENTER key at this time.
3. You should verify that your User ID is placed
in the Project Field
under the heading “From ISPF
Library”, that the Group Field contains
“C3121”, and that the Type Field
contains “ASSY”.
Normally,
you should not need to change anything in these fields.
4. Use the TAB key to move to the box labeled
“Name” in the section
labeled “From Other Partitioned or
Sequential Data Set”. Enter
‘CSU.PUBLIC.DATA’
along with the single
quotes. Hit the ENTER key after you do
this.
The next slide show a typical appearance of the screen
before ENTER is hit.
The “From Data Set” Menu
Shown
The “To Data Set” Menu Shown
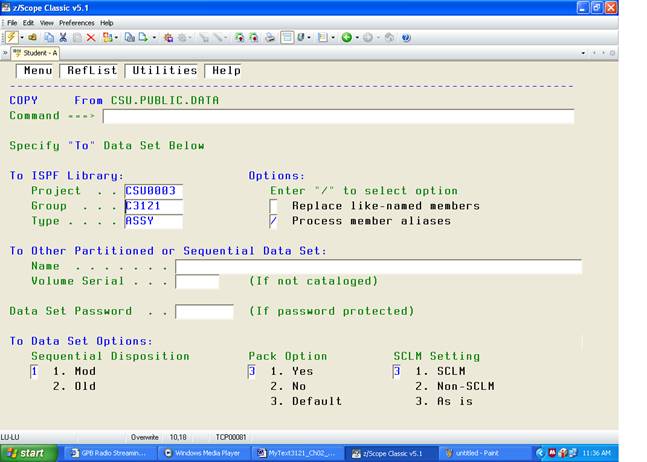
If the fields in the area “To ISPF Library” are
correct you just hit ENTER.
The
Project name must be your User ID.
The Copy Menu Described
You should now see the Copy Menu.
It has a list of files down the left side. You are looking for “LAB01”.
1. Use the function key F8 to move down the list
until you see the name.
If you
go too far, use the function key F7 to move back up the list.
2. When you see a screen with the file name “LAB01” on it, use the
TAB key to move the cursor into
the box just to the left on the name.
If you
go too far, press the SHIFT key and hit TAB to move back.
3. Place an “S” in the box just before the file
name.
4. An optional step it to TAB over to the prompt
box to the right of
the file name and enter a new
file name.
If you
do not place a new file name, the file will appear as LAB01 in
your listing. As I already had a file by that name, I chose
another name.
5. Hit the ENTER key and complete the copy.
The Copy Menu Shown
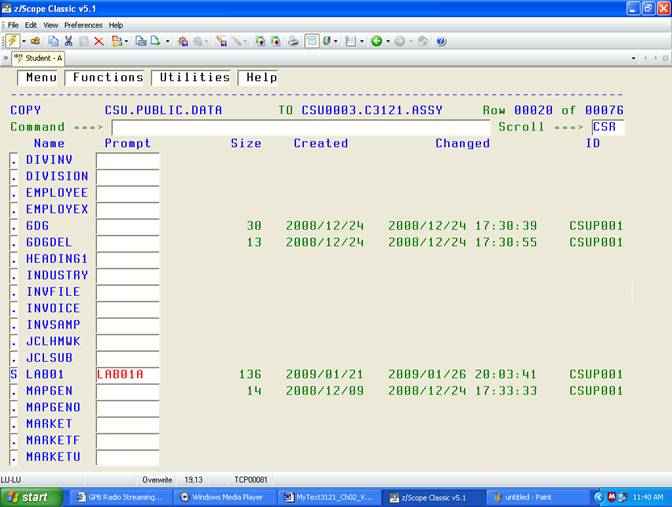
As noted above, I chose the name “LAB01A” only to
change the file name.
Edit the File in Your
Project
You are now in a position to edit the file to make it
your own.
You
MUST change the User ID from CSU0003 to your own.
Generating the Next Lab
Once you have obtained a copy of the file, you should
hit the function key F3
a number of times to return to the ISPF Primary Options Menu.
The discussion of how to run a program will be given
below.
Once the program LAB01 (or any other program) is run, the file should
NOT be changed. This is especially true
of LAB01,
which contains the
basic code structure to be used by every other program.
We now discuss how to copy the file LAB01A into a new file
LAB02.
1. From the ISPF Primary Options menu, select
option 2 for Edit.
2. In the Edit menu, I verify the Project, Group,
and Type fields,
and then enter the name LAB02 for the new
file.
Project CSU0003
Group ASM
Type SRC
Member LAB02
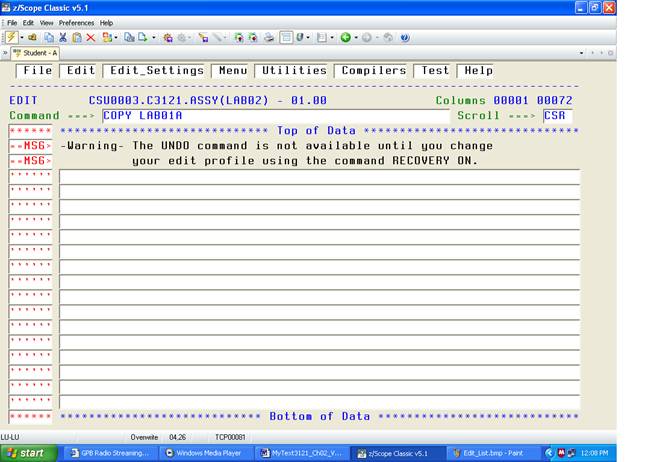
Generating the Next Lab
(Part 2)
3. Hit ENTER to obtain a
blank edit page. Enter the command
COPY followed by your file name,
here “LAB01A”.
Generating the Next Lab
(Part 3)
4. Hit ENTER to obtain
the copy.

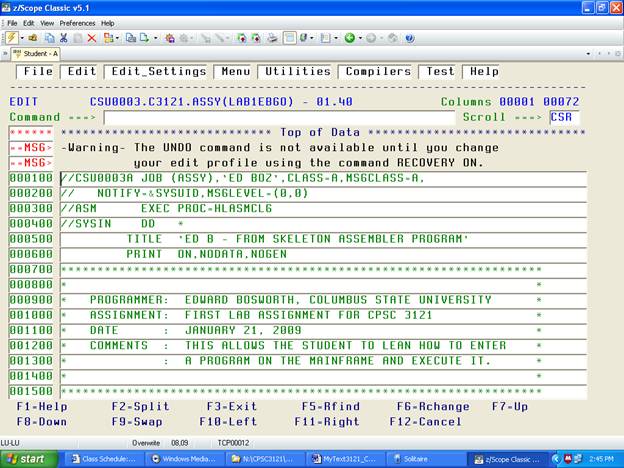
Necessary Editing Changes
(For All Labs)
1. The first line must begin with your User ID,
with a random letter
attached. My user ID CSU0003 is expanded to CSU0003A.
2. Change the ‘ED BOZ’ to something appropriate for your program.
3. Change the TITLE in line 500 to something
appropriate to you.
4. Change the description in lines 900 – 1300 to
include your name,
the date the program actually was
written, and its purpose.
WARNING: If you do not
change the User ID in the first line to your
User ID, the
program listing will be placed in my project.
Should
that happen, I shall discard it without grading it;
you will get a 0
(zero) for the assignment.
Entering the Editor (Step 1)
From the ISPF Primary Option Menu, select option
2. You will see.
Entering the Editor (Step 2)
You could enter the file name in the Member field, or
just hit Enter to see.
Use the TAB (and Shift–TAB) key to move to the box
just in front of the file
you want to edit, and then place an S in the box.
Hit ENTER to open the file for editing.
The Dual Mode Editor
The editor is a classical Dual Mode Editor, of the
type rarely used today.
The editor has two modes: Insert and Command.
In the Insert Mode, text is entered into the program.
In the Command Mode, commands are executed and text is
not entered
into the program. Common commands move
up and down the file, delete
lines of text, and enter the Insert Mode.
Changing Editor Modes
To enter the Insert Mode, place an
I on the line number of the line
after which you wish to insert text and hit ENTER.
To leave the Insert Mode, just enter a blank line and
hit ENTER.
Text in a single line can be changed while in Command
Mode.
Just use the cursor control keys to place the cursor
and type the new text
that is to replace the old text.
Executing a Program
The easiest way to execute a program is to open its
file with the Editor
and then typing SUBMIT in the Command Line.
Hit ENTER to submit.
When I submitted my job, I saw the following at the
screen bottom:
IKJ56250I JOB CSU0003A(JOB02189) SUBMITTED
***
Hit ENTER once to view the results of the
submission. You should see
one line containing the text MAXCC = 0. This
indicates a success.
If you see something like MAXCC = 4 or MAXCC = 8, your program had
one or more errors and requires further editing to fix it.
If you do not see anything, you probably have an error
in one of the first
two lines of the program. Be sure your
User ID is set correctly.
Hit Enter again to return to the Editor. Either correct your program or hit F3 a
few times to return to the ISPF Primary Options Menu and view the output.
Setting Up
the View Filter
In order to see your program listings, you must first
set up the view filter.
This must be done only once, after you run your first program.
1. In the ISPF Primary Options Menu, enter the
two character string “SD”.
2. Tab over to the Filter command box and hit
ENTER.
3. Enter a 1 into the area provided.
4. Tab into the first Value box and enter your
user ID. You see my ID.
The Output Queue
From the ISPF Primary Option Menu, enter the 2
character string “SD” to
access the SDSF system, and then enter the single character “O” (not the
digit “0”)
to display the Output Queue.
TAB down to the box in front of the job you want to
display.
There are two options that are commonly used.
1. If you had a MAXCC = 0, enter a “?” (as shown above), then an “S”
in front of the PRINTER ASM entry in
the next menu, to see the output.
2. Otherwise, enter an “S” in the above menu
to see the program listing.
Purging the Output Queue
If you run many programs, or make many attempts to run
a single program,
your Output Queue will get rather full.
In order to avoid clutter, it is best to purge the
output queue occasionally.
1. From the ISPF Primary Options Menu, enter the
two character command
“SD”, followed by ENTER to access the SDSF system.
2. Enter the single alphabetical character “O” for Output Queue.
3. Use the TAB and Shift–TAB keys to move the
cursor in front of
each JOBNAME you want to delete
and place a “P” in the box.
Do not
hit ENTER unless you want to purge only one job.
4. Hit ENTER after you
have selected the last of the jobs to be purged.
5. The best option requires you to verify each
job to be purged.
After doing this, exit the menu in the standard way.
Exiting and Logging Off
It is VERY IMPORTANT that you log off in an orderly
fashion.
1. Return to the ISPF Primary Options Menu.
2. Insert the one–character command “X” and hit ENTER.
3. If you are prompted to select an exit option,
choose
which ever one you fancy.
4. Enter the six character string “LOGOFF”.
5. Disconnect from the Mainframe by going to the
File Menu of
the terminal menu and clicking on
Disconnect.
6. Shut down the Terminal Emulator.
AGAIN: If you
terminate your session without logging off in the
correct manner,
you may be frozen out for about an hour.
It
just takes that long for the Mainframe Operating System
to clear your
session and permit another logon.